This checklist is for small business owners setting up or refreshing an in-store checkout in 2026. It covers the equipment and supplies that can make a checkout station easier to operate, while leaving room to match each choice to your store’s workflow.

Get business pricing on office and shipping supplies
- Business-only prices and quantity discounts
- Tax-exempt purchasing
- Multiple users, one account, clear invoices
The sections follow the checkout flow: start with the POS terminal, then consider scanning, printing, cash handling, payment acceptance, and receipt paper. Some slots include a named pick; others offer advice only, so you can choose based on your setup.
Use the list to check fit and compatibility before buying. Confirm how each device connects to your POS, where it will sit, and who will use it. Treat the product names as starting points, then verify current specifications with the seller and your POS provider.
POS Terminal
The POS terminal is the checkout’s control point, so choose it around the way your business actually sells. Before comparing models, list the tasks it needs to handle: ringing up items, applying your checkout workflow, and coordinating with the other devices in this checklist. The right fit depends on your POS software and the connections it supports.
A common mistake is choosing a terminal first and discovering later that a scanner, printer, drawer, or card reader does not work with it. Check supported operating systems, ports, wireless options, and any required accessories against the exact device versions you plan to use. Confirm whether the terminal is intended for a fixed counter or a mobile checkout, and measure the available space, including room for cables and staff movement.
Ask your POS provider or seller to confirm device compatibility before ordering. Consider screen visibility from the operator’s position, the placement of customer-facing components if needed, and how the setup will be powered. A simple written connection plan can help you avoid buying equipment that cannot communicate with the rest of your station.
What to look for:
- Confirm the terminal supports your POS software.
- Match its ports and wireless options to your peripherals.
- Measure counter space and cable clearance.
- Check power requirements and intended placement.
Barcode Scanner
A barcode scanner can make item entry more consistent when your products have barcodes and your checkout workflow supports scanning. The listed pick is the Tera Wireless Barcode Scanner with Screen, Pro Version 1D/2D/QR, Bluet. Its product name identifies support for 1D, 2D, and QR codes, along with wireless use; confirm the specific connection method and supported formats for the version you are considering.
Do not assume that a scanner will pair with every terminal or POS simply because it is wireless. Check the exact pairing options, operating system support, and POS compatibility. Also verify whether your inventory labels use formats the scanner can read. A common buying mistake is focusing on code types while overlooking how the scanner sends data to the checkout system.
Think about fit at the counter and how staff will use the device during a typical transaction. Confirm the scanner’s dimensions, charging or power arrangements, and whether its screen and controls suit the intended operators. For a busy or compact counter, consider where the scanner will rest between uses and whether its wireless setup suits the distance and layout. Have the seller or POS provider confirm the connection details before purchase.
What to look for:
- Verify compatibility with your terminal and POS software.
- Confirm supported barcode formats match your labels.
- Check the wireless connection and pairing steps.
- Review dimensions, power, and charging arrangements.
- Consider where it will sit between scans.
Tera Wireless Barcode Scanner with Screen, Pro Version 1D/2D/QR, Bluetooth, 2.4G
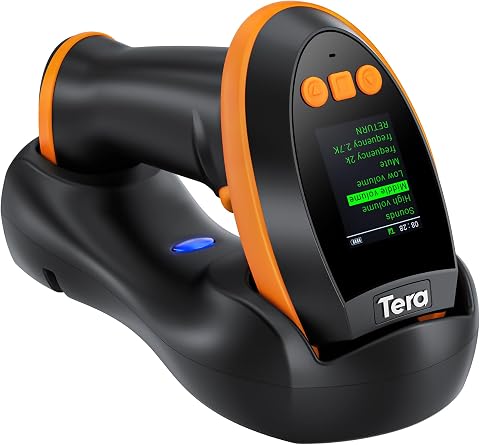
The Tera HW0009 is a versatile wireless barcode scanner featuring a customizable screen for setting adjustments. It offers fast, accurate reading of various barcode formats, including high-density and challenging types, with a large 2500mAh battery for all-day use.
Pros:
- Customizable screen for personalized settings
- Fast and accurate barcode scanning including high-density formats
- Multiple connection options with long wireless range
- Large battery supports all-day operation
Cons:
- Requires pairing setup via barcode scan
- Bulkier design due to screen and cradle
- Potentially complex configuration for some users
Best for: Stores that scan compatible product codes at checkout
Not ideal for: Setups without verified wireless and POS compatibility
Bottom line: Confirm code support and connection details for the exact scanner version.
Receipt Printer
A receipt printer matters when your checkout workflow includes printed receipts. The listed pick is the Star Micronics mC-Print3 Thermal Receipt Printer. Before choosing it, make sure your POS software supports the printer and that its connection options match the terminal or network arrangement you intend to use.
A frequent mistake is treating a printer as a standalone purchase. Check the exact model’s supported interfaces, required cables or accessories, and any setup steps with your POS provider. Confirm the printer’s footprint and leave space for paper access and routine loading. If the counter is tight, measure the planned location rather than relying on a product category name to infer dimensions.
Consider what your staff need during a normal checkout: access to the paper compartment, a clear path for printed receipts, and a practical location near the operator. Check the paper compatibility and roll dimensions specified for the exact model, then choose suitable receipt rolls separately. Verify power requirements and whether the printer connects directly to the terminal or through another supported route. These checks help prevent a mismatch between the printer, the POS, and the consumables you keep on hand.
What to look for:
- Confirm the exact model is supported by your POS.
- Match its connection interface to your setup.
- Measure the printer location and paper-loading clearance.
- Check the required paper roll dimensions.
- Verify power and any needed cables or accessories.
Star Micronics mC-Print3 Thermal Receipt Printer

The Star Micronics mC-Print3 is a high-speed thermal receipt printer capable of printing at 400mm/sec. It features USB-C connectivity, cloud printing support with CloudPrntNext, and is splash-proof and dust-proof, making it suitable for retail and hospitality environments.
Pros:
- Fast printing speed of 400mm/sec
- Supports multiple connectivity options including USB-C, Ethernet, and Bluetooth
- Splash-proof and dust-proof design for durability
Cons:
- Limited to monochrome printing
- Primarily designed for receipt printing, not versatile for other media types
- Requires compatible devices and setup for cloud printing features
Best for: Businesses whose POS supports this thermal receipt printer
Not ideal for: Buyers who have not checked interfaces or paper requirements
Bottom line: Confirm POS support, connection needs, and compatible rolls for the exact model.
Cash Drawer
A cash drawer supports organized cash handling when your business accepts cash at the counter. The listed pick is the All-in-One SmartPOS-129 Professional Cash Register for Small Business,. Its name describes a cash register, so verify what is included and whether it matches the role you need: a drawer component for a POS station or a more complete register setup.
One common mistake is assuming that any drawer will open from any POS printer or terminal. Ask the seller or POS provider how the exact unit is triggered and whether it needs a compatible printer, cable, or other connection. Check the drawer’s dimensions and the counter space available, including clearance for it to open fully. Make sure the placement works with the staff member’s position and does not obstruct nearby equipment.
Confirm the cash workflow your team intends to use and compare it with the product’s stated features. Review the configuration of the compartments and any included accessories rather than inferring them from the product name. Check power and connection requirements, then test the planned arrangement with the terminal and printer models you expect to use. A compatibility check before purchase can prevent a drawer that cannot be opened through your checkout system.
What to look for:
- Clarify what the exact product includes.
- Confirm how it connects or is triggered by your POS.
- Check compatibility with the planned printer and terminal.
- Measure the drawer and full opening clearance.
- Review compartment layout and power requirements.
All-in-One SmartPOS-129 Professional Cash Register for Small Business, POS Bundl
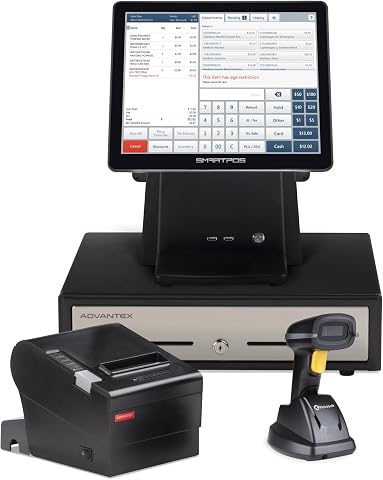
The SmartPOS 129 is a professional all-in-one POS system designed for small businesses, featuring a 15-inch cashier touchscreen, customer-facing display, cash drawer, thermal printer, and barcode scanner. It offers seamless integration with card processors and a free mobile app for easy management and checkout.
Pros:
- All-in-one system with comprehensive hardware included
- No hidden fees or subscriptions
- Easy setup with free support and mobile app
Cons:
- Requires space for multiple components
- Potential learning curve for new users
Best for: Cash-accepting businesses with a compatible checkout setup
Not ideal for: Setups without confirmed trigger or connection support
Bottom line: Verify the product’s included components and POS connection before buying.
Card Reader
A card reader should fit the payment flow you want at the counter. The listed pick is the Square Terminal – Credit Card Machine to Accept All Payments. Before selecting it, confirm that your business can use the relevant Square service and that the device supports the setup you intend to run. Check the current product details and service requirements directly with Square.
A common mistake is assuming that a payment device will integrate with any POS system. Verify whether you plan to use it as part of a Square setup or alongside another POS, and confirm the supported connection and workflow for that arrangement. Check what connectivity is required at your location and where the terminal will be placed so staff and customers can use it comfortably. Review any account or configuration steps that apply to your business.
Think through the counter layout before ordering: measure the space, identify a suitable power location, and consider how the device will be positioned during checkout. Confirm which payment methods and functions are supported by the exact model and service in your region; do not rely on the product name alone. If you already use a POS, ask its provider whether the intended Square Terminal workflow is supported.
What to look for:
- Confirm service availability and account requirements.
- Check compatibility with your POS workflow.
- Verify current supported payment methods for your region.
- Review connectivity and power needs.
- Measure the counter and choose a usable placement.
Square Terminal – Credit Card Machine to Accept All Payments

The Square Terminal is a portable payment device that allows businesses to accept all major credit and debit cards, process chip cards quickly, and print receipts. It is designed for use at the counter or on the go, with a built-in battery for all-day cordless operation.
Pros:
- Portable and cordless for flexible use
- Fast chip card processing
- Accepts all major card types
Cons:
- No detailed information on pricing or fees
- Limited specifications provided
Best for: Businesses planning a checkout flow supported by Square
Not ideal for: Stores that need an unverified third-party POS integration
Bottom line: Confirm service, integration, and regional support for the exact device and workflow.
Receipt Paper Rolls
Receipt paper is a checkout essential whenever your printer workflow uses printed receipts. This slot has no named product pick, so begin by identifying the exact printer model and checking its specified roll dimensions and paper requirements. A roll that looks close in size may still be unsuitable for the printer.
A common mistake is ordering by a broad label such as “thermal paper” without checking width, roll diameter, or core requirements. Use the printer documentation or ask the seller to confirm compatible specifications. Consider where you will store supplies and how staff will replace rolls; choose an arrangement that keeps replenishment straightforward without crowding the checkout area.
Build a simple replenishment routine around how your business operates. Keep the printer’s model details with your supply notes so future orders can be matched accurately. If you use more than one printer, check whether they share the same paper requirements before assuming a single roll type fits every device. Confirm paper compatibility with the exact printer and intended receipt workflow before stocking up.
What to look for:
- Match roll width to the printer specification.
- Confirm maximum roll diameter and core requirements.
- Check that the paper type suits the exact printer.
- Keep printer model details with reorder notes.
- Plan storage and an easy restocking location.
Use a compatibility-first buying order: identify the POS terminal and software, confirm which peripherals they support, then choose the scanner, printer, drawer, and card payment workflow. Finish by matching receipt paper to the exact printer model. This sequence helps each choice fit the checkout you are building.
You can work through the checklist one decision at a time. Measure your space, confirm connections with the relevant provider, and keep model details handy when selecting accessories and supplies. A little preparation makes it easier to create a checkout setup that fits your team and day-to-day operations.